CTK Precision
Ultimate Gun Rest & Vise
by Joe Koprash
Where do I begin? Well how about from the beginning?
I received a large box in the mail one fine fall day and couldn’t figure out for the life of me what it was. CTK? What is CTK? Then it hit me, the gun rest that I asked to do the evaluation on, great! Got it in the house and quickly unwrapped everything like a kid on Christmas morning.

Now right from the start I had planned on using a Savage model 99 in 22-250 because I wanted to see if this rest could be used on any type of firearm. So I went out and bought a new Redfield mount for it and new Redfield rings for the 50mm objective I wanted to mount on this coyote gun. I sat down in the afternoon to put the rest together and found it very easy set up requiring only two 7/16’s wrenches from the garage. I put two bolts into place and it was done, completely set up and ready for me to start mounting that scope.

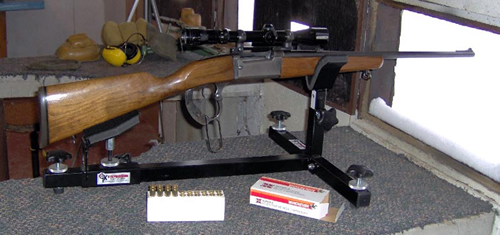
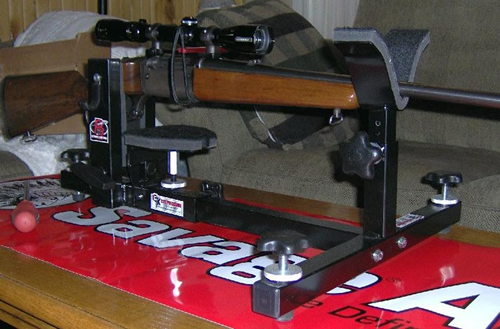
The next step was to add on the CTK P3 Gun Vise and lock it into place. Wow, all I had to do was slide the receiver rest up a couple inches and connect the vise, it was done in literally seconds. The large plastic handles that the rest and vise use are very easily tightened and loosened with a large locking ring on all the legs as well.

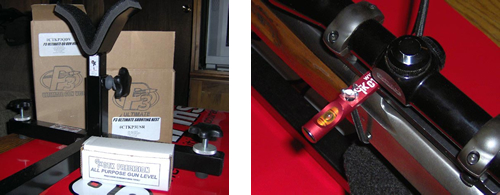
After installing the vise I slid the gun into position and opened the package marked CTK All Purpose Level, a nifty little gadget in itself. Following the easy directions I put the small vise on top of the scope base and tightened the cord underneath so I could see the level bubble easily. A couple twists and a turn and the gun was level so the scope was ready for the gun. I slid the scope into the bottom of the rings and installed the top halves of the rings not tightening them right down yet, one glance at the level just to make sure and I got out my bore sighting kit.
Once it was installed properly I had a peek through the scope to find that I was way off. Not to worry as the Redfield Jr. mounts are easy to adjust for windage with the rear screws, but I decided to first see if there was enough internal adjustment to make it instead of taking the scope rings off again. Then disaster strikes! The adjustment stopped so I figured I’d just back it off and move the rings but it wasn’t meant to be. Instead the reticule is stuck at the bottomed out position and won’t return.
It just so happened I picked up a box of .375 Winchester ammo the other day and that gun hasn’t been to the range in a long time, so I changed directions. With a new candidate the 22-250 was returned to collect dust for a short time and the Model 99 .375 came out to breath the air once again. She’s heavy and needs a cleaning but let’s see if she’ll produce the groups she was getting before deer season came around.
I set the the rifle in the vise and it is another perfect fit, a couple turns and it’s locked into place just as fast as the previous one. Everything is the same as before only now we’ve got a Redfield Lo Pro 3-9X topping it with Leupold mounts and rings, not going to make the other mistake again. Just for grins the bore sighter was installed to verify that nothing had moved and everything seems to be still as I had left it. With everything checking out, it was time to head to the range.

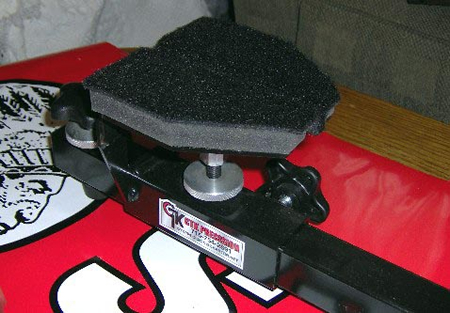
The first thing that I noticed was that the vise comes off in less time than it takes to install (which was mere seconds). The padding on the side of the vise is a really fine foam that grips the gun with a strong bite. When the gun is taken out of the rest you can watch the foam slowly expand back into it’s original shape. So now I’ve got my gun all set, the scopes on and I’m ready for the range, lets go.
At the range I was utterly amazed as this rest does it all. After setting up at the bench and walking out 100 yards to put up a target, I sat down with the rest and got comfortable. Upon looking through the scope to see my starting elevation and realized I had to raise it, so I loosened the front knob and brought it up to a closer bead on the target and then got ready for the fine tuning.
As most of you guys shoot the same as me with one hand on the gun and the other crossed under you with your elbow touching the table it taught me that CTK really did their homework, the elevation adjustment was right there and easily accessible without even having to move my left arm. Fine tuning the elevation was a breeze.
The rear of the rest, where the butt stock sits, feels like it’s riding on ball bearings as it slides smoothly along the main beam of the rest without a hint of binding. I’ve spoken with Curt Knitt, the designer and manufacturer of the rest, and asked about the smoothness of this rear stock rest. Curt informed me that it is the E-Coat finish that makes it slide so smoothly as the frame is given an acid wash before the coating is put on so it has a good clean base to adhere to. When I also learned that the owner keeps his rest outside all year long at his own range I was amazed. Through the cold snowy Wisconsin winters and the rain of the summers he swears all he has to do is give it a wipe with some Armor All and it looks brand new again.
“Shooting 1/4″ groups is common” says Curt, and even I managed to get 2 holes touching and a third just off the first time out with it. Coming from a 375 Winchester with 200 grain bullet I was impressed because this particular rifle is far from being a bean field tack driver. If you were using this rest to dial in a scope, you can adjust for point of impact with no hassle.
This rest was built to withstand a lot of punishment, probably due to the result of lesser rests being destroyed by some of the newer high velocity magnum rounds being invented these days. The gun slammed me hard and I cut my lip with my thumb knuckle as I forgot how much recoil the old 375 had, shook that off and had a look through the spotting scope, nice. The second shot needed hardly any adjusting which meant the rest held it’s place and was very stable like it was glued to the bench but the shell hit about 7-8” low, something was wrong. This is when I noticed that I’d left the scope set at 4X, yep, now I felt dumb. Cranked it back up to 9X and started again. It was sure nice to find out that the gun had held it’s zero after all those months before deer season, first group was very tight and 2 shells were even touching, the second group was the same only it looked like it was stringing a bit after I had moved my elevation of the scope up a bit. The older guy beside me sure was eyeing up that rest and asked where I had gotten it, I’m pretty sure there was a sale made that day, he really liked it just as much as I did.
I have a bench rest myself and I’ve got to tell you all that packaging this one up was the hardest thing I’ve ever had to do, but it had to go back to CTK. I can easily see myself ordering one of these Ultiumate Rests from CTK Precision along with the vise attachment in the future. Once you’ve tasted quality like this rest and vise there really is no exception.
I shouldn’t forget to mention that with the sliding rear rest this rifle rest is not just for rifles, it is a pistol shooters dream as well. With a flick of the knob all you have to do is slide the rear rest forward and it’s ready for your pistol. With the legs made the way they are all it requires is seconds with the adjustable legs to set your angle when shooting pistol. As many of you pistol shooters know you jump out of the rest a lot when shooting but this rest was built with outstanding extra support so when this happens you won’t need to readjust your angle at all.
Original Review: Savage Shooters