
PROJECT GUN
By Ben Battles
Williams Gun Sight Co.
Project 700

When you think of Williams Gun Sight – a company that’s been around for 81 years – you probably think of gun sights, right? Well, I’m hear to expand your horizons, and let you know that there’s also a team of highly skilled gunsmiths lurking within, ready to build you the firearm of your dreams.
The plan with this Project Gun column was to find a use of a Remington 700 SPS hunting rifle that was hardly ever used anymore, and held no sentimental value. Since the Model 700 action has long been the foundation of choice for gunsmiths to work their magic on – due to its inherently strong design and wealth of aftermarket support – we thought that the “forgotten” rifle would serve as an ideal starting point for constructing a precision rifle that would exploit the Model 700’s advantages. A long-range, tactical/precision rifle is the direction we decided to take.
While visiting websites and flipping through catalogues of some of the top precision rifle builders in the industry, I began jotting down notes of features and aspects of these rifles that I thought made sense. I’m not a big advocate of bells and whistles on a rifle that is intended to be deployed in a tactical setting. The “keep it simple, stupid” principal is very applicable to the tactical/precision rifle. Distractions from “reading” the wind or making the proper M.O.A. adjustments on your scope, etc., are, well, distracting. The theme of this build was to create a tactical/precision rifle using proven and simple components, with the outcome being a rifle that would be equally at home in both the urban environment and the 1,000-yard arena.
For any custom firearm build, there needs to be a good parts source on hand. The one we used, Brownells, had everything that was needed, and more. We’ve used Brownells several times in the past for On Target project guns, and for good reason – they always have what we need, they have a great catalog and wonderful website, parts always arrive in a timely manner, and you can bet money on the fact that you will be greeted by a helpful, pleasant voice when you order by phone. After spending a considerable amount of time glued to their catalog narrowing down my options, I placed the order. All the part numbers listed in subsequent paragraphs were taken right out of Brownells latest, 500-page #59 catalogue. Orders can be placed by phone at (800) 741-0015, or on their website at www.brownells.com.
Once all the parts arrived, we had to figure out who we were going to entrust with the task of dismantling our Remington 700 and putting it back together the way we envisioned. Having seen what the gunsmiths from Williams Gun Sight Co. were capable of – with their various displays of custom competition and hunting rifles at a few of the industry shows – I was curious to see what they were able to put together when given a pile of tactical/precision goodies, a run-of-the-mill hunting rifle, and only a idea of what I had in mind for a finished product. A call to Kevin Wigton, Williams’ Service Department Supervisor, to discuss the idea ensued.
When I explained to Kevin what we were going for with “Project 700,” he was quick to offer several smart recommendations. I told him that barrel length needed to be a compromise, with the end product being a light and maneuverable rifle (a relative term for this type of firearm), while at the same time having a barrel that was not so short as to have a detrimental effect on velocity and down-range energy. With the Shilen .308 Win., chrome-moly, 26-inch, No. 7 contour barrel we got from Brownells (part #801-738-107), there was plenty of room for trimmin’, and when Kevin asked me what I had in mind, I told him somewhere around 20 inches. He noted that to achieve the performance I had in mind, 20 inches was a tad on the short side, and that 22 might be a better overall length. After comparing past .308 Win. Velocity read-outs from our Oehler chronograph – fired from various length barrels – I found that 22 inches did, indeed, seem to offer the best compromise. Concurring with Kevin’s thoughts, the rifle and box o’ parts were shipped to Williams, where gunsmith, Rob Canze, was assigned the first duty of creating a barrel that was to our specification.
The Transformation
AFTER OUR SHILEN BARREL had been trimmed to length, Rob still had a few things to do at the back end before it could be mated to the action. The barrel came from Brownells pre-threaded for the receiver, and short-chambered for the specified cartridge. Being “short-chambered” means that the chamber is cut most of the way, but requires the finishing touch of a hand reamer to reach the proper headspace – a task easily accomplished by a competent ‘smith. Next, Rob removed the factory recoil lug and installed a Tubb oversized lug in its place (part #840-700-101). The recoil lug fits between the action and barrel, extends down into a recess in the bedding area of the stock, and prevents lateral movement between the action and stock. An oversized lug is a little bit of insurance on a rifle that will see a high round count and/or hard use, like our 700 likely will.
Rob next undertook the chore of “blueprinting” the action – meaning checking factory tolerances and bringing them back into spec if necessary in order to make sure the action’s internal components mate and work seamlessly together. Rob then threaded the muzzle and handed the barrel off to Bob Fowler for installation of a Williams Guideline Varmint Muzzle Brake.
You might recall an article in a past issue of On Target where we sent our Marlin 1895M in .450 Marlin to Williams Gun Sight for installation of their then-new Guideline brake. We were extremely pleased with the seamless installation and ability of the Guideline brake to turn a painfully hard-hitting brush gun into a rifle with which you could kill a box of ammo and not be forced to seek physical therapy afterward.
With what has to be nearly 100 ports on the sides and top (the bottom remains unported so as not to kick up dust when firing prone) the brake on our 700 did a great job of taming muzzle rise – allowing faster follow-up shots – as well as reducing perceived recoil. Although the brake is a separate, thread-off piece, Bob did such an impeccable job of blending it into the exact contour of the barrel that you’d never know it was removable. Once complete, the barrel was handed back to Rob for installation on the receiver.
The last task Rob had on his checklist after barrel installation was to install a Badger Ordnance Tactical Bolt Knob (part #093-000-007). The idea with the Tactical Bolt Knob is to provide a larger and smoother bearing surface to “work” the bolt. Being roughly four times the size of the factory bolt, it offers much better leverage and a more secure purchase. Installation requires machining down the factory knob, threading the end, and then screwing on the tactical knob.
Once all the machine work was complete, Joe Rundell took over and hand-engraved the On Target logo onto the right side of the barrel, and its chambering, “308 WIN,” onto the left side. This took care of the last metal work, so Kevin Wigton snatched the barreled action and began to lay down the Parkerized coating to facilitate better adhesion for the top layers of Dura-Coat finish. While the Parkerizing was “setting-up,” Kevin created a stencil of the On Target logo to be used by Carl Benko as he applied the final finish.
By now the barreled action had been test fitted in its H-S Precision Police Rifle Stock (part #393-100-705), which is the same stock Remington uses on its factory Model 700P L.E. precision rifle Made from Kevlar and graphite-reinforced fiberglass, and with a molded-in aluminum bedding block, the H-S stock has all the right ingredients for a solid foundation. Its palm swell is just the right size, putting my trigger finger right where it needed to be on the face of the trigger, and it features a wide, beavertail forend with dual swivel studs – one for a bipod and one for a sling. Best of all, it’s a real bargain, and helps keep costs low while not sacrificing the integrity of the finished product. While the stock was still separated from the barreled action, an H-S Precision detachable-magazine floorplate was installed (part #393-210-711 – includes one 4-round magazine).
Although there are several do-it-yourself finishes on the market, unless you have a good deal of prior painting experience, final finishes on expensive guns are best left to professionals. Carl Benko is a professional. The finish on our 700 is comprised of multiple layers, with a speckled and spider-web patterned black over olive-drab green predominating, with hues of the underlying red base coat showing through just enough to add to the earth-tone look we were going for. In between applying the red base green top coats, Carl applied the On Target stencil that Kevin had made onto the left side of the buttstock, which – when the finish was completed – would show through in bright red. A nice and well executed touch.
When the finish fully dried, Kevin took up the torch for the final time, adjusting the factory trigger down to the pull weight we specified of just over two pounds (a task best left to a qualified gunsmith.) He then mounted a one-piece Badger Ordnance Maximized Scope Rail (part #093-306-060) and Maximized 30mm Standard Scope Rings (part #093-306-080) that were part of our Brownells order. We’ve used this combination of rugged, all-steel Badger Ordnance parts several times in the past with excellent results. They are “install and forget” type products.
Once the barreled action was in its final resting place within the H-S stock, Kevin mounted one of his shop test optics and brought the rifle out onto the Williams Gun Sight range for a test run. As one might expect of a rifle built with this much attention to detail, our “new” 700 worked flawlessly, and Kevin reported printing several 100-yard, 3-shot groups in the ¼-minute territory.
Upon our 700’s arrival back at On Target, I promptly broke out the Burris Fullfield II 3-9×40 Tactical Scope I had lying in wait. With its O.D. green, anodized finish, it matched the rifle’s finish almost perfectly. Because I had originally planned on mounting a scope with a 30mm main tube, however, I had to place another order into Brownells for a set of Badger Ordnance one-inch reducers (part #093-306-120) that would fill out the inside diameter of the rings to accommodate the one-inch tube of the Burris. (For more information on their new line of tactical optics, contact Burris at Tel.: (970) 356-1670; E-mail: [email protected] Web: www.burrisoptics.com).
With the scope sitting securely in the rings, I packed up the 700 and a selection of match-grade ammo and headed for the range to see if I could duplicate the performance Kevin reported. Once dialed in at 100 yards – and with no small thanks to the Williams muzzle brake and lightened trigger – our made-over 700 proved to be an incredibly easy rifle with which to place shots precisely. Though I didn’t break the ¼ -minute mark that day, I came damned close with a 0.35-inch cluster fired with Winchester’s 168-grain Supreme Competition load. Other brands of ammo on hand included Hornady’s TAP FPD and Black Hills’ 168-and 175-grain offerings – all of which managed at least one group under half an inch. With a little more barrel break-in time, I have no doubt that this will be a consistent ¼-minute rifle.
All told, I couldn’t be happier with the work completed by the Williams gunsmithing team. They were professional throughout the process, and they completed a “show quality” transformation in a timely manner and at reasonable rates. Consider them highly recommended.
When you’re ready to turn the ‘smiths of Williams Gun Sight Company loose on one of your own projects, they can be reached at Tel.: (800) 530-9028; Web: www.williamsgunsight.com
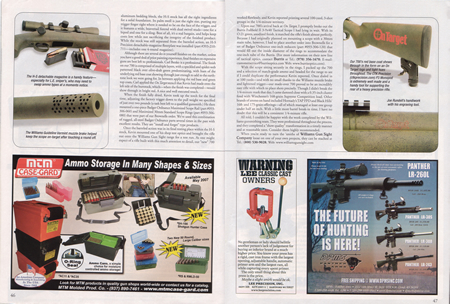
Photo caption (far upper/right photo):
Our 700’s red base coat shows through in the form on an On Target logo and light hues throughout. The CTK Precision (ctkprecision.com) P3 Monopod is extremely well made and a handy tool for supporting the rear of a heavy precision rifle.